Subject development environment in preschool educational institutions. Traffic rules corner in the senior group
Kolosanova Natalya Dmitrievna
Subject development environment in preschool educational institutions. Traffic rules corner in the senior group
The issue of child safety on city streets is very relevant.
Children's ignorance of the rules of behavior on the road often leads to trouble. Therefore, familiarizing pupils with the rules of the road is one of the main tasks of preschool teachers. Part of this important work is the mandatory creation of a traffic rules zone in all groups .
When creating any developmental zone in a group , including a traffic rules center, the teacher must be guided by the requirements of the Federal State Educational Standard.
According to the provisions of the Federal State Educational Standard for preschool education, teachers are required to improve the quality of educational work with children through the organization of a subject -spatial developmental environment in the group . The subject-spatial environment carries enormous opportunities for pedagogical influence on the child - it educates and develops him.
for corners in accordance with their theme, but general provisions are highlighted for all children's activity centers in kindergarten:
meeting the interests of children;
filling the material base taking into account the age characteristics of pupils;
aesthetics, attractiveness and comfort - to create a good mood;
convenience and accessibility of corner for every child - material in the traffic rules center should be freely accessible to children;
multifunctionality of the play corner ; the gaming environment should be easily modified depending on the learning situation;
optimal location in the group (relative to the light source, other thematic corners );
corner variability ;
taking into account the regional component when designing a corner .
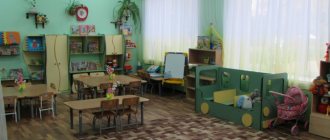
Contents of the traffic rules center in the senior group .
I present to your attention the design and attributes corner in our group .
The corner has everything necessary for children to learn the rules of the road.
A model of our area with a roadway and an intersection, which has removable parts: children can model the street on their own.
A set of road signs and a traffic light. There are colorfully designed road signs: if they are constantly in the center of children's attention, preschoolers will quickly remember them.
On the wall hang bright colorful posters on traffic rules and safe behavior on the road.
Fiction, riddles, crosswords on the topic of road rules.
A card index of didactic games, didactic and board games on traffic rules has been created.
Cards depicting dangerous situations that may occur on the roadway.
We often place children's creative work on traffic rules in the corner Children look at them and discuss them.
There is everything you need for role-playing games.
The corner presents all types of road transport: buses, trolleybuses, cars and trucks.
Attributes for the role-playing game “Exam in a driving school”
: window for issuing licenses, driver's licenses, clothes of a traffic police inspector.
One of my favorite games is Gas Station. This year we built a gas station and a car wash.
In the corner for parents there is also information material and recommendations on current topics related to traffic rules.
Parents take an active part in replenishing attributes for role-playing games. The road layout was created with their active participation.
Having a traffic rules corner in a group will help preschoolers acquire the necessary skills for safe behavior on the streets and roads.
Do-it-yourself game layout according to traffic rules for kindergarten
Master class on making a game model “City Street”
Author: Oksana Sergeevna Norkina Teacher, MADOU kindergarten No. 21 “Rosinka” of the combined type of the urban district of the city of Kumertau, Republic of Bashkortostan The master class is designed for educators, but can also be useful for parents. Purpose: teaching game modeling, developing safe behavior on the roadway. Goal: making a model for game modeling in working with children of senior preschool age. Objectives: - introduce children to the rules of the road, the purpose and signals of traffic lights, road signs, expand knowledge about the rules of safe behavior for children on the street; — to encourage children to engage in independent activities in the traffic rules corner. The game layout can be used to develop fine motor skills, visual perception, social and everyday orientation, and spatial orientation.
Description: Stage I - the basis for the layout To make the basis for the game layout “City Street” we will need: 2 pieces from an MDF panel (I have them 53 cm each), a piano hinge, screws and nuts for fastening.
Using a drill, we drill holes in the MDF panels in selected places, and secure the piano hinge with screws and nuts.
So that our model stands at an angle of 90 degrees and does not fall back, we screw a corner stop on one side (for me it is part of the fastening from an old curtain), and paint the lower part of our model with black paint.
Now we will design the upper vertical part of the layout. To design it, we take 2 pictures depicting houses (I put together these for myself).
We print the pictures in duplicate and laminate them; if you don’t have a laminator, you can simply cover them with tape. The picture becomes brighter and it is easier to care for the layout - for example, wipe off dust. We paste one copy of our laminated pictures, joining them onto the layout, this is what we should get.
Now we will add volume to the card. To do this, we cut out buildings from second copies at our discretion, and glue them onto pre-prepared ceiling tile blanks - single background and double foreground, in my work I used “Master” ceiling tile adhesive
Cutting out buildings with a utility knife
We paste it (I still use the same “Master”) on the layout, our street now has “depth”.
Let's move on to the design of the roadway. We take construction tape, highlight the pedestrian crossing, the dividing strip, that is, what we will paint over with white, and cover everything else.
In my work I use ordinary aerosol paints in a spray can, sold at any hardware store, dry quickly, and are easy to use. We highlighted all the lines with white - remove the tape. The roadway and crossing are ready.
Stage II - Paper machines. Now he prints out paper machine templates; there are a huge number of them on the Internet; let’s take these as an example.
The image has been reduced. Click to see original.
The image has been reduced. Click to see original.
We laminate the printed templates (1 sheet of laminated film - 2 sheets of templates with cars), fold the sheets with the white sides inward. We laminate them so that the cars become tougher, brighter and can be wiped clean. When the sheet is laminated, we cut it along the contour and we get 2 sheets laminated on the colored side, the second side remains unlaminated (paper) - the paper sticks together better, and laminated machines shine. This is what a laminated sheet with templates, cut on 3 sides, looks like.
We cut out the car templates and glue them together.
Stage III - road signs. Now let's move on to making road signs. Materials: I used 2 sheets of regular white office paper, ceiling tiles (better washable), a stationery knife, toothpicks, master glue, mosaic in 3 colors (red, yellow, green), laminated sheet with blank signs, I used this one.
The image has been reduced. Click to see original.
We cut out and paste 1 copy onto the tile, cut it along the contour with a stationery knife, and on the other side we glue 2 copies (if you wish, you can not paste the second part of the sign. We make a stand for our signs. Take a sheet of white paper and cut strips of 4-5 mm along the long side sheet. For one sign, you need 5 strips.. Take one strip and twist it onto a toothpick, forming a tight “roll” - this is the upper part of the stand. Glue 4 strips into a long strip, twist it into a “roll”. On a large roll, put a small one on top, glue it together. Dip the edge of a toothpick in glue, pierce our “rolls”, pierce the blank with a road sign with the other edge of the toothpick. Our sign is ready.
To make the traffic light more voluminous, add a small mosaic of the appropriate colors to the lights, pierce the holes with an awl, and insert the mosaic.
Our fleet
Our signs
Thanks everyone for your attention!
We recommend watching:
Summary of the travel game “Lessons of Caution” for older preschoolers Didactic game on traffic rules for kindergarten “My Native Village” Educational and entertaining game on traffic rules for older preschoolers Competitive game program on traffic rules in the senior group “My Bicycle Friend”
Similar articles:
Scenario for children's traffic rules competition in the preparatory group
Long-term plan for the development and management of role-playing games
Scenario for a parent meeting on traffic rules in a preschool educational institution
Project on traffic rules in the senior group
Summary of a lesson on life safety in the preparatory group
Traffic rules Corners and centers - Didactic manual for preschool children “Screen according to traffic rules”
Publication “Didactic manual for preschool children “Screen on ...”
Didactic manual for preschool children “Screen on traffic rules” This didactic manual was created as part of the implementation of an educational and creative project for preschool children “Safety Island”. The relevance of this manual is due to statistics...
Image library "MAAM-pictures"
Subject-spatial environment in the middle age group “Traffic Code Corner”
Subject-spatial environment in the middle-age group “Traffic Code Corner” Quite recently, our kindergarten hosted a regional review competition “The best traffic rules corner.” Our group “Daisies” took an active part. Has a huge role in raising children...
Multifunctional didactic manual made of felt on traffic rules “Magic Chest”
“Magic chest” We have a lot of different toys in our kindergarten. And here is a magic chest: Blue - yellow - red! When it opens, the guys are surprised! Streets, cars, all kinds of signs... We will use it to teach road rules. Let all the guys remember: “On the road - not...
Didactic manual made from felt “Traffic Light Christmas Tree”
On the eve of the New Year, the methodologist offered to take part in the traffic rules challenge #PDDelka. Taking part and making a Christmas tree myself is not exactly what I would like, it’s impractical. Therefore, I decided that the Christmas tree should be functional and used as a game. For my...
Good ideas for creating better traffic centers and corners.
Contained in sections:
- Safety, life safety. Safety Corners and Centers 289
- Traffic rules Traffic rules for children 25870
By groups:
- Senior group
- Preparatory group
- Middle group
Showing publications 1-10 of 783. All sections | Traffic rules Corners and centers
New
Photo
The best
Didactic manual “Lapbook on traffic rules “Funny Car”
Explanatory note Didactic manual lapbook on traffic rules “Funny Car”
intended for children of senior preschool age. The contents of the folder can be changed and complicated, depending on the topic and tasks. This manual is a means of developmental learning, it assumes...
Didactic manual “The Big Book of the Little Pedestrian”
The carpet book “The Big Book of a Little Pedestrian” is designed in the form of a book. It contains pages that are held together using lace binding, buttons and a zipper. Each page will be interesting to children in its own way. They can be easily taken out and assembled into a single carpet book. Also for the book...