Benefits of the lesson
Sand as an art material has several advantages. And most importantly – a relaxing, therapeutic effect. The child gets rid of the effects of stress, and emotional stability returns to him. Sand painting is used to treat sleep disorders, neurotic disorders, and anxiety in children. Sand art is also useful for healthy children; it allows them to calm down after failures, get rid of low self-esteem and the phobia of becoming a loser. The child sees that a bad drawing can be corrected at any time.
The second benefit of sand painting for children is a developmental activity. The technique improves finger motor skills, sensory perception and creative thinking. Drawing usually involves both hands, which has a positive effect on the development of both the right and left hemispheres of the brain. For schoolchildren, fiddling with sand improves writing skills. It is useful to use the technique with children for whom studying is a burden. In this case, sand painting becomes a good addition to homework and allows you to consolidate school knowledge through art.
The third benefit of drawing on sand is the revelation of artistic potential and the manifestation of imagination. The technique has no restrictions and strict rules. You can draw with your hands and various devices. The loose texture of the material allows you to create images of any complexity and degree of detail. Drawing with sand is available for toddlers, middle school preschoolers, and schoolchildren.
Characteristics of the method
In preschool childhood, playing with sand helps in the development of spatial imagination, teaches logical thinking, develops attention and fine motor skills. Sand animation has a relaxing and calming effect, so it will be especially useful for hyperactive preschoolers.
This method is a wonderful finger gymnastics, expression of fantasies, manifestation of acting abilities, which has a beneficial effect on the emotional development of the child, his sensitivity and perception of the world around him. This method will help parents learn better about the inner experiences of their children, help with the expression of feelings and emotions, an exciting game that can captivate and calm.
Even an adult may have difficulty expressing and interpreting emotional states, but for a child this can be an overwhelming task. Sand therapy promotes the manifestation of emotions and their expression in a playful form.
This method is a creative process in which there are no specific frames or boundaries. Thanks to this, the child can express his personality without fear of reproaches and mistakes. This method, which without unnecessary stress, will allow the child to transfer internal experiences to the outside world.
Sand painting materials
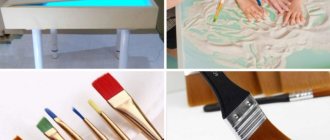
To learn to draw on sand, you need to purchase a list of materials and equipment. All of them are affordable, you won’t have to fork out a lot of money. Here's what the young artist will need:
- table with sides and a lighting device at the bottom;
- sand;
- antistatic agent in a can;
- additional equipment - art brushes, sticks, sieve, templates;
- a wide and flat brush for sweeping grains of sand from the corners of the table.
An antistatic agent is necessary to prevent sand grains from sticking together, which is inevitable when quartz material is used repeatedly. The spray should be sprayed before each lesson. A regular antistatic agent is suitable, preventing synthetic clothing from sticking to the body.
You can buy a table or make it yourself. Homemade design - sides connected in a rectangular shape with a bottom made of frosted glass or plastic up to 5 mm thick. It is necessary to fix the lamp from below so that diffused light is obtained. The lighting can be anything: in the warm and cold range, even colored. The legs of the table should not wobble, otherwise when drawing you will not be able to draw neat lines.
The finished table is a structure with sides and a bottom in the form of an illuminated tablet. The optimal format is 130x70 cm, but for a child 70x50 cm is enough. The height of the sides should be at least 6-7 cm, but from the side of the drawer it is only 3 cm, otherwise it will be inconvenient to draw the lower elements. It is necessary to leave indentations for sand 10-15 cm wide on the right and left sides. It is advisable that these areas be in the same plane as the space for drawing, this makes it more convenient to use many techniques. But some ready-made tables have tray recesses on both sides.
Any sand will do. You can buy an aquarium one at a pet store, and a special one for creativity at a supermarket in the children's section. You can contact a children's and adult creativity studio where sand animation is practiced, if there is such an institution in the locality. They probably won't refuse to sell a small amount of sand. The fraction of the material can also be any. It is advisable to get different ones, since fine sand is convenient for creating tones and halftones, and coarse sand is convenient for creating large image details.
If there is a river near your house, you can dig up sand on the shore. You just have to filter it through a fine-mesh sieve, then rinse. The washing procedure looks like this:
- Pour 4-5 kg of sand into a bucket. This is the standard amount for drawing.
- Fill with water to the edge of the bucket.
- Stir gently with your hand or a large spoon.
- When dust and dirt particles rise to the surface and heavier grains of sand settle to the bottom, carefully drain the water.
- Repeat the procedure until the drained water becomes crystal clear.
- Dry the cleaned material on the balcony if the weather is sunny, or on a radiator, or in the oven.
You can replace sand with semolina, finely ground salt, and to create darker and more contrasting elements of the image - ground coffee.
Bulk material should be renewed once every 3 months, and if the child draws every day, then once every 1.5 months. If this is not done, the sand will become less pliable, since with constant friction the grains of sand are destroyed and the structure of the material softens.
Sand painting technique
The technique of creating sand drawings is not difficult, but when teaching a child you will have to be patient. The main tool is the artist’s hands, but it is possible to use auxiliary devices.
Before your child starts drawing, introduce him to the art material. Offer to immerse your hands in the sand, pour it from one palm to the other, and talk about your feelings. After becoming familiar with the material, you can begin to learn drawing methods.
Fist rash
This is the first DIY sand painting method that a preschooler should master. Ask to take the material into your palm, clench it into a fist, and turn it along a vertical axis so that the grains of sand fall down. Explain to your child that the amount of sand spilled out is regulated by squeezing and relaxing the fist muscles. If more grains of sand spill out, the “mound” becomes denser and darker. This creates images with a smooth transition from light to shadow.
Lines of different sizes
Next, preschoolers master drawing lines of different thicknesses, lengths, and tortuosities. Teach your child to draw dotted lines, curls, and waves. This is the best method of getting used to the original drawing technique for a preschooler of the younger group.
To create a thin straight or curved line, you need to pour a strip of sand from your fist, then put two fingers together - your thumb and forefinger, and run them along the strip. You will get a line of the same thickness throughout. Explain to your child that you should not strain your fingers too much, otherwise the image may turn out uneven. If a thicker line is required, the fingers need to be connected diagonally.
Drawing with different parts of the hand
When drawing on sand, different parts of the hand are used. They move one or more fingers over the material, move them and spread them apart. Large elements and thick lines are depicted with a fist and the edge of the palm extending from the little finger. To create many small details, they poke the sand with their fingertips, and draw fine lines with their nails.
Drawing on dark and light
When the above-described drawing methods have been mastered, you can begin to select a compositional basis. You can draw “in the dark”: fill the background with sand to make light lines on it. Or “in light”, that is, create a dark sandy image on an empty background. Typically, professional artists combine these methods. At the initial stage, it is enough for a child to master them separately.
Drawing with aids
To make sand drawing more fun in kindergarten, let children use not only their fingers and palms, but also additional devices. What you can draw:
- Artistic brushes of different hardness. They are convenient to depict hair and wool.
- Toothpicks, hashi sushi sticks, cooking skewers. Optimal for creating thin and graceful lines, fancy patterns, and detailed drawing. It is advisable to use wooden products; they will not scratch the plastic bottom of the drawing table.
- Comb, small rake. With their help, you get neat waves.
- Colored paper. It is placed on the table and sand is poured on top. Uncovered areas of the design are multi-colored. The method is applicable for creating floral motifs and abstract patterns.
- Funnel. Pour sand through it, create slides, paths, patterns - a fascinating activity.
- Fine mesh sieve. With its help, the table is covered with a thin layer of sand, which can become the background basis for the drawing.
- Stencils. You can use ready-made ones. Or cut them out of plastic lids or cardboard for practice. Or use different flat objects for this purpose. You need to place them on a clean table surface, sprinkle them with sand, and then carefully remove them.
- Pendulum. Attach a round-shaped weight to the thread and give it to the child. Let the pendulum swing over the sandy surface, creating patterns of different depths. This is a wonderful method of strengthening the skill of correct pressure and speed of movement when creating a drawing.
- Cylinder with patterns. You can use a toilet sleeve. Apply patterns on it with a thick layer of glue. Wait until it dries, then give it to your child. Let the cylinder roll on the sand, creating patterned paths.
Exercises
Here are some popular sand painting exercises on light tables for children:
- Letters. The lesson is useful for older preschoolers and younger schoolchildren who are learning to write. Spread sand on the table in a dense layer. Let your child learn to write letters beautifully and develop finger motor skills.
- Water landscape. To create it, walk with your outstretched fingers along the sandy surface, imitating waves. At the top of the composition, make thin strokes with your nail - these will be distant ripples. Draw the horizon with the edge of your palm, remove the excess in the upper part - this is the sky above the reservoir.
- Clouds. Take sand into your fist. Pour it out in a thin stream, making circular, non-sweeping movements.
- Maple Leaf. Draw lines that form the outline and veins of the leaf. Sharpen the outline by running your finger along the outer edge of the line, moving the sand inward. Use your fingernail to follow the veins. Outline the border of the petiole.
- Sun. Take sand into your fist and lift it 20-30 cm above the table surface. Pour out evenly, trying not to move your hand. Grains of sand, falling from a height, bounce off the plastic surface, form a ring, and the middle remains empty. And its diameter is wider, the higher the hand is raised.
- Mountain landscape. Spread the sand in a horizontal direction using quick zigzag movements. Use the edge of your little finger to walk along the upper part, removing the excess to create a relief.
Games and art therapy exercises
Sandy beach
Invite your child to imagine that he is on the seashore on a sunny day, grains of sand tickle his palms, he can hear the splash of waves, and there is silence all around. Let the baby touch the sand, take a handful while taking a deep breath and squeeze his fingers as hard as possible. As you exhale, the child gradually pours out the sand and relaxes.
Target:
development of tactile sensitivity, regulation of muscle tension, development of self-control.
Paths
Start with simple straight stripes. Then move on to broken, broken and wavy lines. Invite your child to draw a path home for their favorite fairy-tale character.
Target:
improvement of coordination of movements and orientation in space.
Additional exercises: “Rain” - for practicing drawing vertical lines. “Ladders” - this exercise teaches you to combine vertical and horizontal lines.
Sand doodles
Two people are playing. One person closes his eyes while the other person draws a simple doodle in the sand. Then the first participant opens his eyes and can complete the scribble, turning it into some kind of understandable image. Then the players change roles.
Target:
development of imagination.
My favorite toy
A child draws his favorite toy with sand and then describes it in words without naming it. The adult or other children present must guess what thing is being talked about.
Target:
development of coherent speech and communication skills, formation of the ability to understand each other.
Animal portraits
Invite your child to draw with sand animals expressing joy, delight, anger, fear, sadness, surprise. Ask the little artist to tell us who he depicted, what mood this character is in, what feelings he is experiencing, what happened to him and why, how you can help him.
Target:
acquaintance with basic emotions, learning to determine the emotional state, help in understanding one’s own feelings, development of coherent speech.
Puzzles
Make a wish for any object: an animal, a bird, a plant, a piece of furniture, a toy. Invite your child to guess what you have in mind based on the clues. If a pear is wished for, it can be described as follows: it is a fruit; grows on a tree; looks like a light bulb. The child must draw his answer on the light table.
You can make guesses and describe events. For example, celebrating the New Year, going to visit. Change roles so that the child has the opportunity to come up with riddles himself.
Target:
development of logical and associative thinking, imagination.
Gardener
“Turn” the light table into an orchard and invite your child to plant it with different plants. The kid makes drawings and tells what grows where. Ask him to describe fruits, vegetables and berries by color, shape and taste. Try to draw together the trees and shrubs on which fruits are ripening.
Target:
acquaintance with the world around us and broadening our horizons, developing thinking and coherent speech.
Complete the picture
Using sand on a light table, draw circles, squares, triangles and ask your child to complete the picture so that you get a sun, a ball, a house, a flag, a piece of cheese.
Target:
development of figurative memory and imagination.
Dressy socks
Children play in pairs or with an adult. The participants’ task is to draw two socks so that they make a set. To do this, you need to agree on what pattern will be on the socks, and try to depict it the same way.
Target:
developing the ability to work in a team, negotiate and come to a common decision, developing the skill of mutual assistance.
Footprints
Invite your child to imagine what the footprints of certain creatures, such as a hippopotamus or a spider, look like and draw them in the sand. Discuss the resulting prints: who left them, what his name was, where he was going, where he was from, what emotional state he was in. You can also depict traces of large raindrops or car tires, or use sand rollers.
Target:
acquaintance with the outside world, development of speech and imagination.
Writing on the sand
Prepare letters or numbers cut out of cardboard for the game. You can use large symbols from magnetic sets. Hand your child a letter or number and ask them to sculpt it out of sand. Rake the sand with the edges of your palms and form a letter. Check the sand letter with the original and start making the next one. So a whole City of Letters will appear on the light table!
Letters and numbers can not only be sculpted, but also written. Let the child draw the desired image with his finger first. Then you can use the stick, holding it like a pen.
Target:
consolidation of the graphic image of letters and numbers, formation of graphomotor skills.
Photographer
You need to play in pairs. Both participants look at each other carefully, trying to remember the features and hairstyle. After this, the children begin to draw a portrait of a friend with sand - take a photograph. When the “snapshots” are ready, discuss how accurate they turned out.
Target:
development of communication skills, mindfulness and social activity.
Journey through a fairyland
Let your child use his imagination and draw a fairy-tale kingdom on the light table. Give the young entertainer time to create, and then ask him to tell him the name of the country, who lives in it, what the character of these characters is, what events take place in the fairy tale.
Target:
development of imagination, logic and coherent speech.
In search of treasure
To play you will need small objects or stickers. Together with your child, draw a diagram map on a piece of paper with conventional images of a tree, river, mountain, forest, house. Using this map, create a sand painting.
When the drawing is ready, ask the child to turn away and hide a small “secret” in any part of the image. Place a cross in the appropriate place on the paper diagram. Give the map to the little treasure hunter and offer to find the treasure.
Target:
learning to draw maps, development of spatial thinking, logic, imagination.
Sand games are diverse. Choose a light table for sand painting, and let the activities help your child learn about himself and the world!
Sand animation for preschool children
The highest skill is shooting sand animation, in which the artist continuously creates images that smoothly flow into each other. And he does this by making the minimum possible number of movements. This is a complex art that requires the master to act quickly and have impeccable artistic skills.
Real animation is unlikely to be within the capabilities of a preschooler, but something simple, for example, a tree that is bare in winter and blooms in summer, he can easily depict after practicing for 3-4 lessons.
Introducing a sand painting master class for children:
- Spread the material evenly.
- Place the pad of your finger on the sandy surface and move upward. Thin the line by gradually raising the pad. You will get a tree trunk.
- Draw branches with your little finger. Make them curved rather than straight so they look natural. It will turn out to be a tree in winter.
- Now make it summer. Sprinkle sand in a wide layer on the ends of the branches - this is the crown. Also sprinkle horizontally under the tree - this is grass.
- Randomly poke your fingers along the crown, pressing to different depths, to make leaves. Draw blades of grass by running your fingernail vertically under the tree.
- Adjust the contour of the tree crown and remove excess sand.
- The animation can be continued by making it autumn. To do this, place a few spots under the tree with your fingers - these will be fallen leaves.
Using this method, you can make a film in kindergarten, for example, on an environmental theme. You just need to attach a video camera above the table so that it films the drawing process.
Sand animation as a means of comprehensive development of preschool children
Irina Kadomtseva
Sand animation as a means of comprehensive development of preschool children
«Sand animation as a means of comprehensive development of preschool children»
“The best toy for children is a pile of sand”
K. D. USHINSKY
In modern conditions, education should not only change in accordance with social changes, but also give impetus to innovative processes. Teachers are constantly searching for ways to transform the educational process in kindergarten into the child’s interested communication with adults and peers in various types of children’s activities.
At this stage, the artistic and aesthetic development of a preschooler is the most relevant, since it is at preschool age that the foundation of a creative personality is laid. After all, as you know, “in creativity there is no right path, there is no wrong path, there is only your own path.” All children have a certain potential for artistic development , so it is necessary to create conditions for the development of creative abilities. Notice these talents in time and try to give children the opportunity to demonstrate them as early as possible. The introduction of the Federal State Educational Standard gave impetus to the search for innovative methods and technologies in working with preschoolers .
One of these technologies is sand animation or, in other words, sand drawing, sand art (Sand-art)
.
It is this technology that is currently being actively implemented by the teaching staff of our preschool educational institution. Sand drawing is rightfully considered a unique art form, since it combines play, activities useful for the development of children , and educational moments. Sand animation differs from classical drawing in that children do not have the so-called “fear of a white sheet”
, because
the “sheet”
is initially
“dirty”
: if you don’t do it the way you wanted, everything can be easily corrected.
If we consider the pedagogical and psychological aspects of the use of sand, it is difficult to overestimate them - it is a sensory material, an object-based play environment , and a material for visual creative activity, experimentation, design, and cognition. At the same time, favorable conditions are created for children to show concentration, curiosity, passion, and also for relaxation. Mental and emotional reserves are activated.
In November 2015, our institution purchased one “ Miracle Sandbox ”
— a table with lighting for drawing with pitch.
Over this relatively short period, we can already say that the forms of work and technology that we began to use when drawing with sand really contribute not only to the artistic and aesthetic, but also to the all-round development of children . Indeed, in addition to acquiring and mastering drawing skills, sand art contains a general developmental and psycho-emotional component.
In my work, I use sand painting to develop cognitive processes; development of creative potential; furnace development ; formation of communication skills; development of fine motor skills ; relieving emotional stress in anxious, aggressive and hyperactive children.
I use sand drawing when conducting correctional, developmental and educational classes . So, for example, these are: educational games (provide the process of learning reading, writing, counting)
;
educational games (give children the opportunity to learn about the diversity of the world around them)
;
projective games (
develop the child's imagination ) .
At the very beginning of using “ Miracle Sandbox ”
We now have rules for playing with sand. All children know and follow them: take care of the grains of sand - do not throw them out of
the sandbox ; grains of sand really don’t like being put in the mouth or thrown at other children; Young artists should always have clean hands and noses. We also have our own rules for teachers: 1) the child only needs to offer options for games and tasks, and not force him to follow a strict program; 2) the structure of the lesson should be adapted to the interests of the child; 3) it is necessary to create space for self-expression, and not establish rigid boundaries and rules; 4) we must value the child’s initiative and his opinion; 5) it is important to stimulate the development of creative situations with questions rather than ready-made answers;
6) you need to support the child in finding his own non-standard solutions to the tasks you set. Before starting classes with children (age 5-6 years), I carried out: diagnostics of the level of development of creative abilities of preschoolers (the “Complete the Figure”
(O. M. Dyachenko)
; diagnostics of fine motor skills and fingers; diagnostics
of the development of creative thinking , imagination, perception.
In my work I use such methods of sand painting as: with a hand, symmetrically with two hands, fingers, palms, fists, a watercolor brush, stacks. And sand painting techniques: drawing, imprinting, leveling, raking sand around , cutting off excess, pouring along the contour.Techniques can easily be combined and combined in one composition.
We divide educational games on the sand into several types:
1. Games aimed at getting to know the world around us (through them we get to know what is next to us: animals, insects, forests, fields, seas, islands, cities, transport, etc.).
2. Geographic games (we simulate different climate zones in the sandbox )
.
3. Historical games and excursion games around your hometown.
4. Projective games in the sand.
5. Games to get to know folklore (fairy tales, cartoons)
.
Such games contribute to the successful development of intellectual abilities, tactile-kinesthetic sensitivity, and fine motor skills. By telling his story, the child learns to formulate thoughts, developing speech , and finds constructive solutions; remembering the plot of a cartoon/fairy tale - develops memory . By playing with friends, the child learns to interact, becomes sociable and self-confident. Children show confidence and curiosity when playing in the sand. The sandbox attracts them much more than a blank sheet of paper. The untouched surface of the sand encourages the child to free and unconventional creativity. In addition, the synchronous use of hands is very useful for the development of 2 main types of perception: intellectual-logical and emotionally holistic. It is also worth noting that when drawing with sand, children who are insecure and have low self-esteem are not afraid to make mistakes. Drawing with sand is also very useful for hyperactive children. By engaging in this type of creativity, the child calms down. In the process of work , the emotional-volitional sphere develops develop .
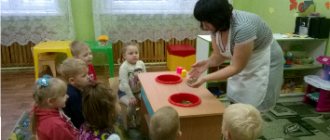
For more successful work on this drawing technique, classes are held individually or in small subgroups (5 - 7 people)
.To create the most interesting and creative drawings, preliminary work is necessary: observation, conversation, excursions, projects, experiments, examination (cognition, reading fiction. In the course of work, children learn to negotiate with each other, describe their works, compose stories and fairy tales based on them
(communication and socialization)
.Immediately
, I conduct finger gymnastics with my children. The content of finger gymnastics often corresponds to the theme of the lesson. At the same time, I use the following structure of games and play activities in the sandbox : introductory part - greeting ritual; introduction to the gaming environment , situation, game task; the main part - exercises, games (drawing with sand, getting to know the characters, building castles, game situations); the final part - reflection, summing up the game, farewell ritual (finishing work in the sandbox , children dismantle their buildings, put away their toys , level the sand )
Speaking about effectiveness, we can note the following:
1. After a year of classes (based on the results of the diagnostics)
activity and independence in drawing has increased significantly; Children now have the ability to find new ways of depicting and convey their feelings in their works; anxiety level decreased; the level of development of fine motor skills has increased.
2. Qualitative changes have also occurred in the development of coherent speech (children began to pronounce words more clearly, compound and complex sentences appeared in their speech). By stimulating children's independence and creativity in visual activities using the sand painting technique, their vocabulary was enriched.
3. Children’s repertoire of role behavior and communicative functions of speech has expanded (children can jointly plan the upcoming game, distribute play actions, evaluate what they heard, draw a conclusion and explain their decision).
4. Sand drawing contributed to the development of graphomotor skills.
5. Children learned to convey the shape, structure of an object and its parts, the correct proportions of parts, using different shades of light and shadow;
6. Children learned to create sand paintings taking into account rhythm and symmetry, they developed compositional skills when depicting groups of objects or a plot (the result of the work was the creation of an animated film using the sand animation ).
The light table for sand painting can be replaced with ordinary photo frames (with a glass surface)
A4 format or plastic trays.
BIBLIOGRAPHY:
1. M. Seitz “We write and draw in the sand. Tabletop sandbox »
, M. INT, 2010
2. O. N. Nikitina “ Sand drawing in psychological and pedagogical practice”, St. Petersburg 2013
3. N.V. Kuzub, E.I. Osipuk “Visiting the sand fairy . Organization of a pedagogical sandbox and sand games for preschool ." SPb.: “Speech”
, M.:
"Sphere"
, 2011
4. T. D. Zinkevich-Evstigneeva “Workshop on sand therapy ”
, St. Petersburg
“Rech”
, 2006
5. N. A. Sachkovich “Technology of playing sand . Games on the bridge"
, St. Petersburg:
“Rech”
, 2008
6. T. D. Zinkevich-Evstigneeva, T. M. Grabenko “Miracles on the sand”
.
Workshop on sand therapy . M.: “Rech”
, 2005
Teacher at MBDOU "Kindergarten No. 3"
Kadomtseva I. V.
(Leningrad region, Sosnovy Bor)